One thing that’s surprised me as I’ve refreshed this photo tips series is the pattern I’ve started to notice. Many of the iPhone’s camera features aren’t things most of us use every day. Some are easy to forget about, while others are designed for very specific situations.
I’ve realized that’s actually a good thing. You don’t need to use every iPhone camera feature every time you take a photo. Most of the time, opening the Camera app and tapping the shutter is exactly what you should do. But it’s nice knowing those extra tools are there when you need them.
Pano Mode is a perfect example. It isn’t a feature I use often, but when I want to capture a sweeping landscape, a tall building, or a scene that’s simply too big for one photo, I’m always glad it’s there.
The more I’ve experimented with it, the more I’ve realized Pano Mode isn’t really about taking bigger photos. It’s about recognizing those moments when the scene in front of you is simply too big to fit into one frame.
👈If you missed iPhone Photo Tip #5: Make Photos Stand Out with Portrait Mode
When a Regular Photo Isn’t Enough
Most of the time, a regular photo is exactly what I need. I see something I want to remember, open the Camera app, tap the shutter, and move on.
But every now and then, I come across a moment that feels bigger than the frame on my iPhone screen. Maybe it’s a beautiful view on vacation, a tall building I’m standing in front of, or a scene where I find myself stepping backward, trying to fit everything into one photo.
I’ve had plenty of moments where I knew the picture I took didn’t quite capture what I was seeing. The photo was there, but it didn’t tell the whole story.
That’s where Pano Mode can make a difference. Instead of trying to squeeze a larger scene into a single photo, it gives me a way to capture more of what is in front of me.
The only catch is that Pano Mode isn’t quite as simple as opening the Camera app and tapping the shutter. To get the best results, it takes a little patience and a steady hand.

It’s Not Just Point and Shoot
One of the reasons I think Pano Mode is easy to overlook is because it asks me to do something I don’t normally do when taking a photo: slow down.
Most of the time, taking a picture with my iPhone is quick and simple. I see something I want to capture, open the Camera app, and tap the shutter. Pano Mode is a little different. Instead of capturing one quick image, it takes a series of photos as I slowly move my iPhone across the scene.
The first time I tried it, I quickly realized there was a little more to it than simply pressing the shutter button. I needed to pay attention to how I moved my phone, keep it steady, and follow the guide on the screen. It wasn’t difficult, but it did take a little practice to get comfortable with the process.
If you’ve never tried Pano Mode before, this short video shows exactly how it works and what the process looks like from start to finish.
Once I understood how Pano Mode worked, I started to appreciate why it is different from taking a regular photo. It isn’t meant for every moment. But when I find myself looking at a scene that feels too big for one photo, it’s the feature I want to remember.
Pano Mode Isn’t Just for Wide Photos
I don’t know about you, but when I think about Pano Mode, I immediately think about wide views. I picture beautiful landscapes, vacation photos, or those moments when you want to capture more of what is around you.
When I started exploring Pano Mode for this series, I realized I had always pictured using it the same way—holding my iPhone vertically and moving from side to side.
What I didn’t realize is that Pano Mode can also help when you want to capture something tall. By turning your iPhone sideways, you can move upward instead and capture more of the scene from top to bottom.
The way you hold your iPhone changes what you can capture with Pano Mode. A wide view works well when you hold your iPhone upright and move across the scene. For taller subjects, turn your iPhone sideways and move upward instead.
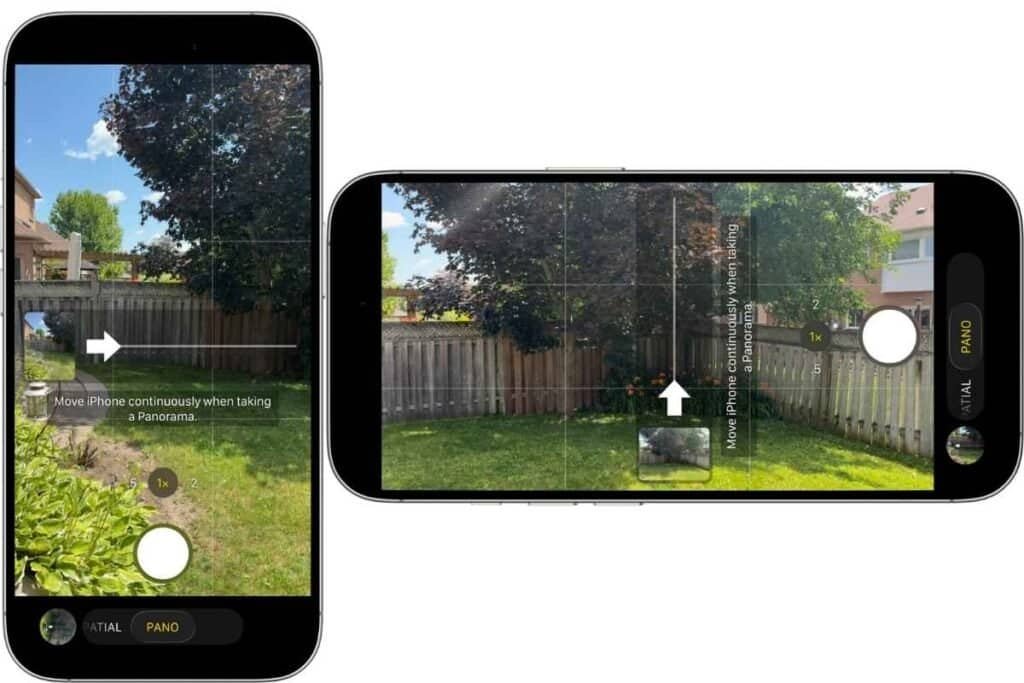
Once I discovered that, Pano Mode suddenly felt like a much more interesting feature. It wasn’t just something I would use for a wide landscape—it became something I actually wanted to experiment with and see what else I could capture.

Try It Yourself
The next time you come across a view that feels too big to fit into one photo, give Pano Mode a try. It might be a beautiful view on a walk, a tall building you’ve always wanted to capture, or even something unexpected that catches your eye.
Don’t worry about getting the perfect panorama on your first attempt. The goal is simply to experiment and see what your iPhone can do.
What’s Next
Pano Mode isn’t a feature I use every day, but exploring it for this series reminded me that some of the best iPhone tools are the ones we don’t think about until the right moment. Sometimes a regular photo just doesn’t capture the full scene, and that’s when knowing another option can make a difference.
Next up in the series, I’m moving from capturing the world around me to making sure I’m part of the photo too. Tip #7 is all about using the iPhone Timer—a feature that makes it easier to take group photos, selfies without the arm stretch, or even set up a photo when you want to be in the moment instead of behind the camera.
👉What’s next? iPhone Photo Tip #7: Take Hands-Free Photos with the Timer
👈If you missed iPhone Photo Tip #5: Make Photos Stand Out with Portrait Mode

Gail Kerr
IT Professional and Technical WriterTechnology has been part of my life for as long as I can remember. With over 28 years of experience providing computer support in both large corporations and small businesses, I’ve seen just about everything. In 2009, I went back to school to earn an Associate Certificate in Technical Writing—combining my love of tech with a passion for clear, easy-to-understand communication. Now, I help people of all levels feel more confident with their devices. I’ve also become the go-to person for friends and family whenever a tech question or challenge comes up.