If you’ve been following along, you know I’ve been sharing quick tips on how to take a good photo on iPhone—simple things you can try right away to get better results with the camera you already have.
So far, I’ve covered how to use natural light, take better low-light photos without flash, turn on the grid for easy framing, and lock focus and brightness to get more control over your shot.
Today, I want to talk about Portrait Mode—and why it’s not just for people.
👈If you missed iPhone Photo Tip #4: Lock Focus and Brightness for Better Photos
What Is Portrait Mode?
Portrait Mode is a built-in feature on your iPhone that helps you take more professional-looking photos—without needing fancy equipment or editing apps. It works by keeping your subject in sharp focus while softly blurring the background. This blur (called bokeh) draws attention to your subject and gives your photo that “wow” factor.

If you’ve never tried it before, don’t worry—it’s easy to find. Just open the Camera app and swipe over to Portrait. Once you’re there, you’ll see the screen adjust and guide you to position your subject properly. On some iPhones, you’ll also get lighting options like Natural Light, Studio Light, or Contour Light—I’ll explain those shortly.
Portrait Mode is one of my go-to tools for making photos feel a little extra special. I’ll show you how I used it to take one of my favorite shots of my dog, Willow, next.
Portrait Mode: Not Just for Faces
Don’t let the name fool you—Portrait Mode isn’t just for people. It works beautifully on pets, flowers, food, and just about anything you want to highlight.
One of my favorite examples? A photo I took of my dog, Willow.
She was sunbathing outside, looking especially cute (as always), and I wanted to capture the moment. I opened the Camera app, swiped to Portrait Mode, and let the iPhone do its thing. The background gently blurred out, making Willow stand out—ears, eyes, and all. The result looked like something I might have taken with a fancy DSLR camera, not just my iPhone.

It’s those everyday moments—your dog in a sunbeam, a steaming cup of tea, a blooming flower on your windowsill—that really shine when you use Portrait Mode.
How to Take a Good Photo on iPhone Using Portrait Mode
After I took a Portrait Mode shot of Willow and it came out looking like something from a photo shoot, I thought—why haven’t I been using this more? If you want to know how to take a good photo on iPhone, give these steps a try.
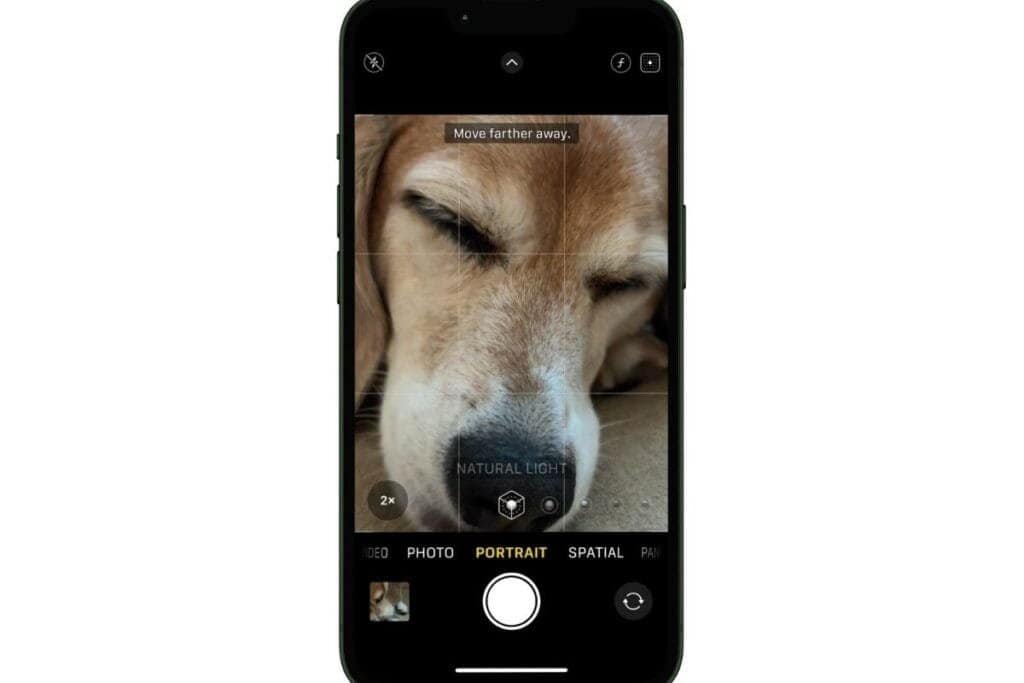
1. Open the Camera app and swipe to Portrait
- You’ll see “Portrait” along the bottom next to “Photo” and “Video.”
- Your phone will guide you—look for prompts like “Move farther away” or “More light needed.”
2. Frame your subject
- Try to place your subject a few feet in front of the background for the best blur.
- Use the grid (from Tip #3) to help with framing—yes, the rule of thirds still applies in Portrait Mode!
3. Tap to focus
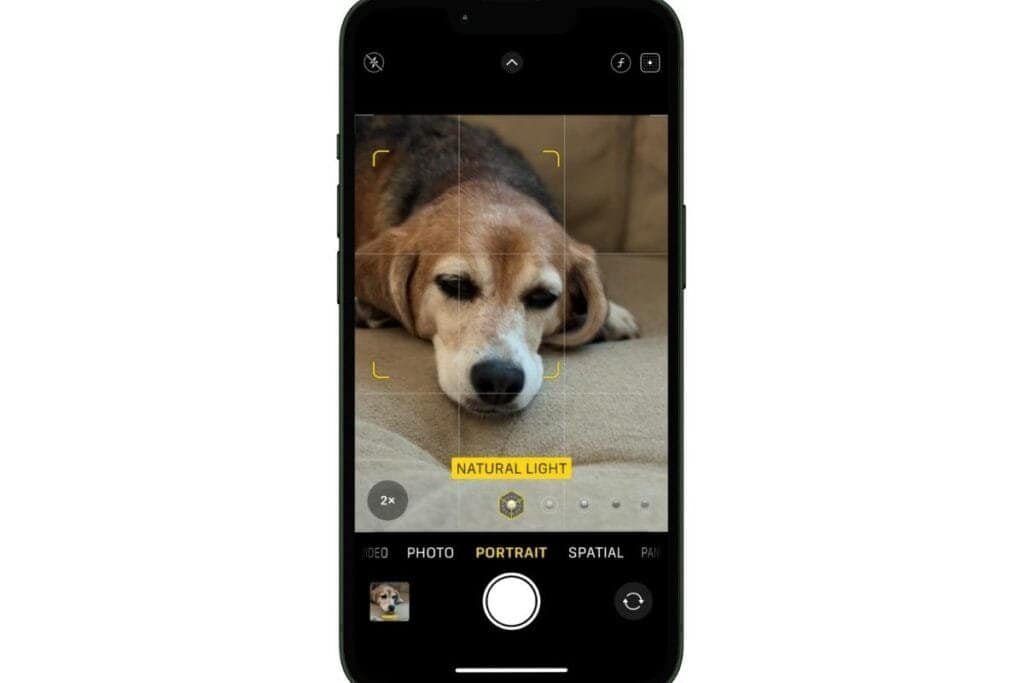
- Tap the part of the screen you want in sharp focus—Willow’s eyes, a flower, your coffee mug, etc.
- You’ll see the lighting label (like “Natural Light”) turn yellow when Portrait Mode is active.
4. Take the photo
- Press the shutter when everything looks sharp and well lit.
- Don’t worry if the blur isn’t perfect—you can always adjust it later.
Once you’ve got the basics down, it’s time to have a little fun—Portrait Mode also lets you play with lighting styles to create more dramatic, eye-catching photos.

Portrait Lighting for a More Dramatic Look
When you’re in Portrait Mode, you’ll see options like Natural Light, Studio Light, and Contour Light appear on screen. These are called Portrait Lighting effects, and they can give your photo a more professional or artistic feel—even if you’re not photographing a person.

Once your subject is in focus, swipe through the lighting styles to see how each one changes the mood of the shot:
- Natural Light (default): Just a soft background blur with no added lighting effects.
- Studio Light: Brightens the subject, like a gentle spotlight. I’ve used this on a close-up of Willow’s face, and it added just the right amount of glow.
- Contour Light: Adds a bit more shadow and depth—great for textured subjects like flowers or food.
- Stage Light and Stage Light Mono: These add a dramatic black background. A little tricky to use on objects, but fun to play with.
- High‑Key Light Mono: A clean, high-contrast black-and-white effect with a bright white background. It’s not available on all iPhones—this one requires an iPhone XS or newer.
📸 Try this: If you’re photographing something like a single flower or a piece of fruit on a plate, try Stage Light, Stage Light Mono and High-Key Light Mono to make the subject stand out. You’ll see the difference right away.
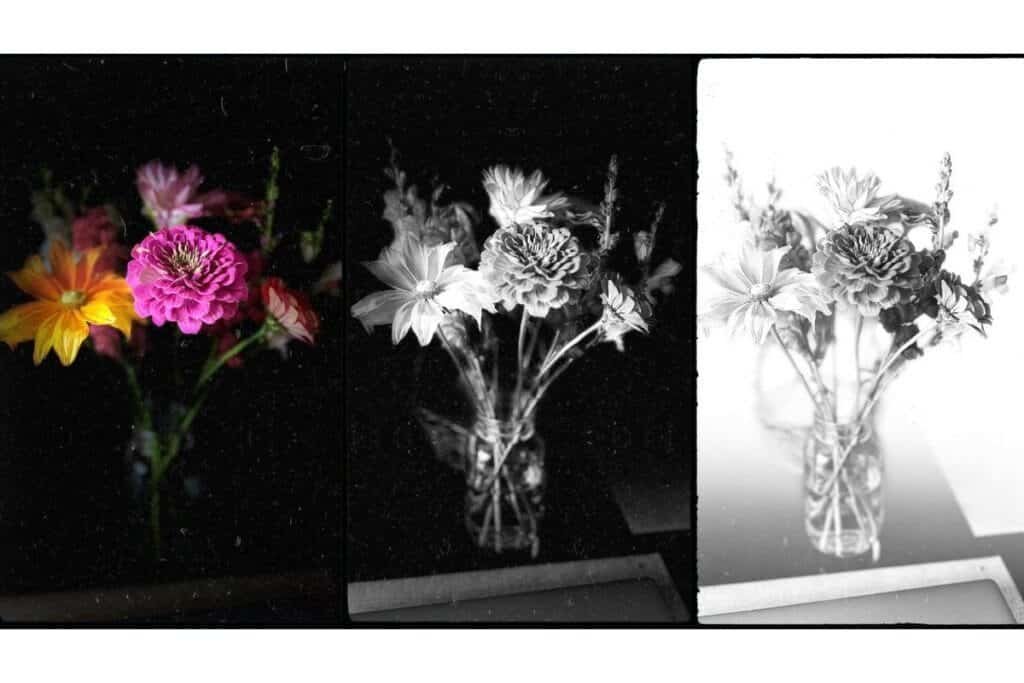
Adjust the Background Blur
So you took the shot, but you’re not loving the background blur? No problem. One of the great things about using Portrait Mode on iPhone is that you can adjust the blur after you take the photo. This is perfect for softening a busy background or dialing it back if things look too fuzzy.
Let me show you how.
- Open your photo in the Photos app
Find the Portrait Mode photo you want to edit and tap to open it. - Tap Edit icon (3 line slide bar) on the bottom to the left of the trash can icon. (Older IOS versions, tap “Edit” in the top-right corner)
You’ll see all the usual editing tools, plus a special option for Portrait photos. - Adjust the Depth Control slider
Look for the icon (ƒ) at the bottom of the screen. Slide left for more blur (lower f number) or right for less blur (higher f number). Watch the background change in real time. - Tap “Done” to save your changes
You can always go back and tweak it again later if you change your mind.

What’s Next?
Now that you’ve mastered Portrait Mode and added a little depth (literally!) to your photos, get ready to go wide.
Next up in the series: how to use Pano mode to capture breathtaking landscapes, tall buildings, or even fit the whole family in one frame.
It’s easier than you think—and you don’t need a tripod or special gear to make it work.
👉 What’s Next? iPhone Photo Tip #6: Get the Full Picture with Pano Mode
👈If you missed iPhone Photo Tip #4: Lock Focus and Brightness for Better Photos
Have a favorite summer photo you’re proud of? Or a moment you wish you’d captured better? Leave a comment or reply—I’d love to hear how you’re using your iPhone with Portrait Mode.


