Let’s be real, emergencies happen. When they do, did you know your iPhone can do more than just sit in your pocket? With Emergency SOS on iPhone, you can quickly call 911 and automatically notify your emergency contacts with your location.
In this post, I’ll walk you through how to set up Emergency SOS on iPhone, add emergency contacts, customize your Medical ID, and practice using SOS safely (without actually calling 911!). Plus, I’ve included a free printable quick guide to help you or a loved one get everything set up in minutes.
What Is Emergency SOS on iPhone?
So what is Emergency SOS on iPhone? Think of it as your iPhone’s panic button. In just a few quick presses, it can call 911 for you. When your call ends your iPhone will send a text automatically with your location to your emergency contacts.
And the best part? You don’t need to unlock your phone. You just press and hold the right buttons (don’t worry, I’ll cover how shortly), and your iPhone gets to work. It’s fast and could make all the difference in a crisis.
There’s also a built-in feature called Call After Severe Crash, which is turned on by default. If your iPhone detects that you’ve been in a serious car accident, it can automatically call emergency services—even if you’re unable to do it yourself. Just keep in mind, Apple notes it may not detect all crashes—so it’s a helpful backup, but not something to rely on 100%.
Important Note: Crash Detection only calls emergency services—it doesn’t send text alerts to your emergency contacts like it does if you trigger Emergency SOS manually.
Before we get into setting up Emergency SOS, let’s talk about the people who’ll get the heads-up if you ever need to use the SOS button, your emergency contacts.
Emergency Contacts
Emergency contacts are the trusted people your iPhone will automatically text with your location after you make an SOS call. It can give you peace of mind that your family or friends know where you are without any extra effort on your part.
You can add emergency contacts two different ways: through the Health app or directly from the Contacts app. Both work the same behind the scenes.
If you have a medical condition, the Health app might be your best bet, it lets you add extra details like medications, allergies, or blood type, which can be life-saving for first responders. But if you just want to quickly assign a contact, the Contacts app method is super simple too.
Important Note: Remember your loved ones will receive a text message after you make an SOS call. Your contact should have a mobile number listed in their contact info to receive a text message.
Add Emergency Contacts in the Health App
- Open the Health app.
- Tap your profile picture (top right corner).
- If prompted, select Get Started. The Edit Information screen will open—fill in any details you’d like (all fields are optional).
- Tap Done.
- Select Medical ID.
- Scroll down to Emergency Contacts.
- Select Add.
- Tap Add Emergency Contact.
- Pick someone from your contacts and set their relationship.
- Tap Done.
Add Emergency Contacts in the Contacts App
- Open the Contacts app and choose the person you want to add.
- Scroll down and tap Add to Emergency Contacts.
- Select their relationship to you.
- Tap Done.
Now your iPhone now knows who to alert if something goes wrong.
📝 Quick Note: These contacts won’t get a text message unless you actually place the SOS call. There’s no way to skip the call and just send the text.
So now that we know what emergency SOS is and how to set up contacts, let’s look at what actually happens when you use it.
What Happens When You Use Emergency SOS
Okay, so what happens when you trigger Emergency SOS on your iPhone? Here’s the quick scoop:
- First, your iPhone dials 911 (or the emergency number where you are).
- After that call ends, your emergency contacts get a text letting them know you need help.
- The text includes your current location — and if you’re on the move, your iPhone keeps updating your location for a while.
A quick heads-up: you can’t skip the call and just send a text. The emergency contacts get the message only after the call to 911 has ended.
How to Use Emergency SOS
Let’s break down how to actually use Emergency SOS—because in a real emergency, you want it to be second nature.
If you have an iPhone 8 or later:
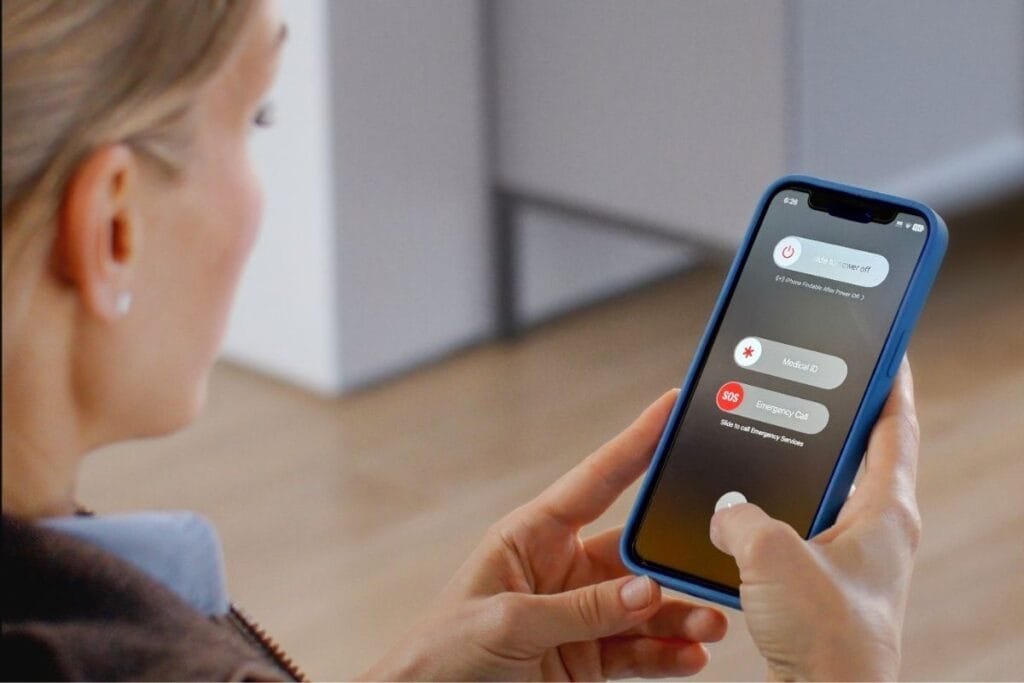
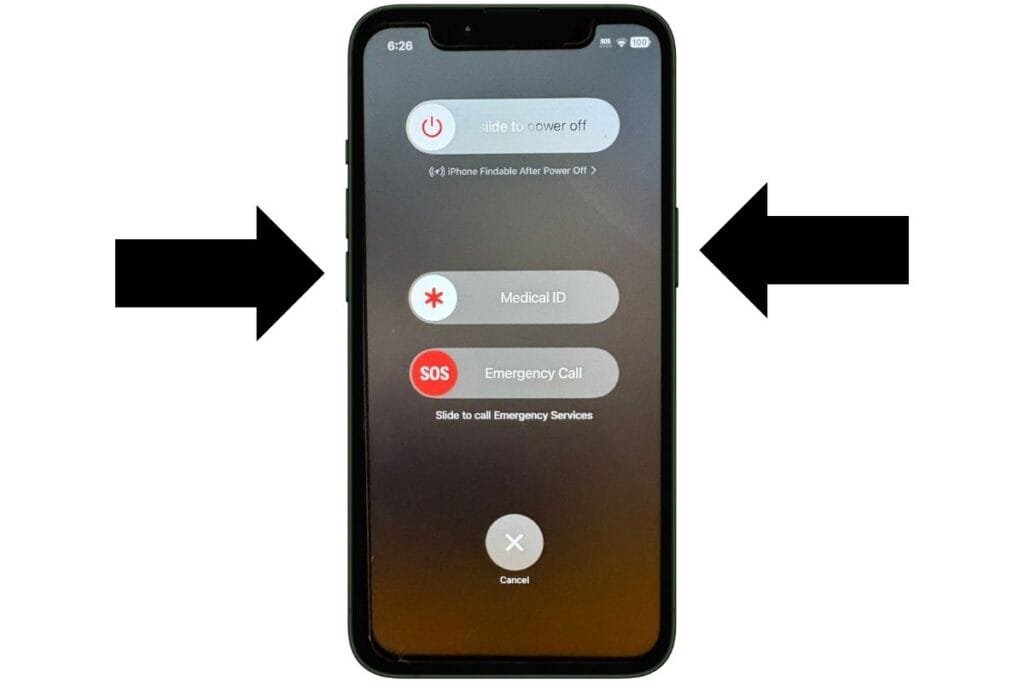
- Press and hold the side button and either volume button until the Emergency SOS slider pops up.
- Keep holding those buttons, and you’ll hear a loud countdown siren (this can be customized).
- If you don’t let go, your iPhone will automatically call 911.
It’s designed so you can trigger it quickly, even if you’re not looking at your screen. If this doesn’t feel natural, you can always customize this setting.
Customize Emergency SOS on iPhone
What if you want to be able to activate Emergency SOS in another way? There is an option that will also allow you to press the side button 5 times to activate SOS. You can also silence the siren. Here is how to customize Emergency SOS.
Go to Settings > Emergency SOS
- Call with Hold – Toggled on by default. Hold the side button and either volume button to start the countdown and call.
- Call with 5 Button Presses – When this is toggled on you can press the side button 5 times to activate Emergency SOS.
- Call Quietly – Toggle this on if you don’t want a loud siren before the call.
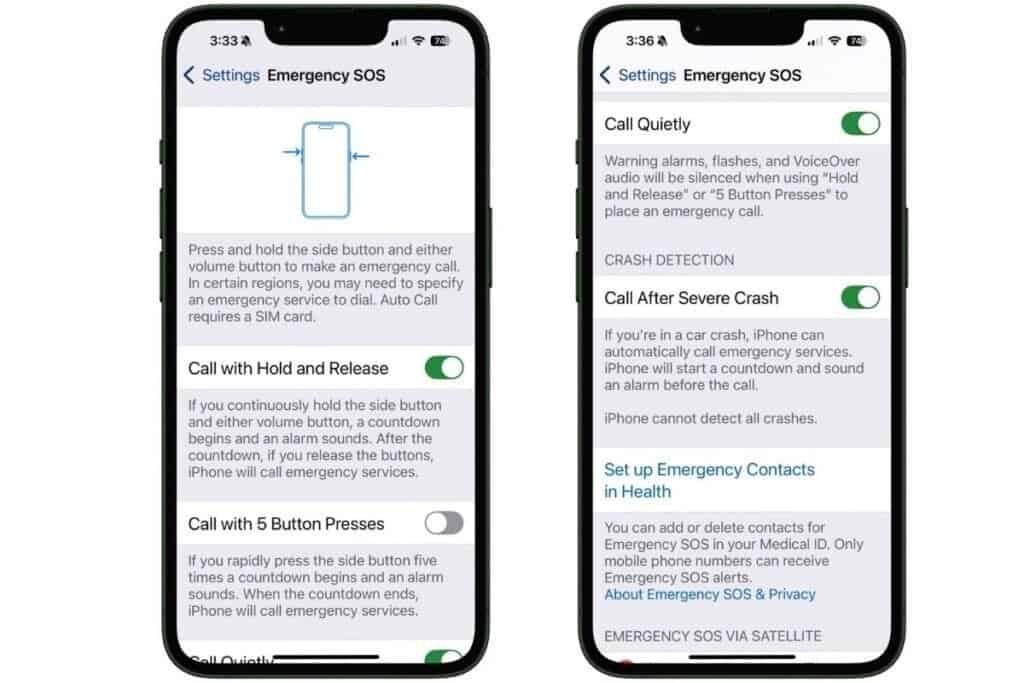
This is your chance to set it up in a way that feels comfortable. Some people want it loud and obvious, while others prefer a more discreet alert.
Now that you’ve set up how to call for help, let’s make sure first responders can see the health info they might need, especially if you can’t tell them yourself.
Customize Your Medical ID
Earlier in the post, I talked about using the Health app to set up emergency contacts, and how it’s especially helpful if you have a medical condition. That is also where you’ll set up your Medical ID.
Think of your Medical ID as your iPhone’s way of speaking for you if you can’t. It gives first responders a quick look at any critical health info, right from your Lock Screen—no passcode needed.
You can include things like medical conditions, allergies, medications, and your blood type. It only takes a minute to fill out and could save your life in an emergency.
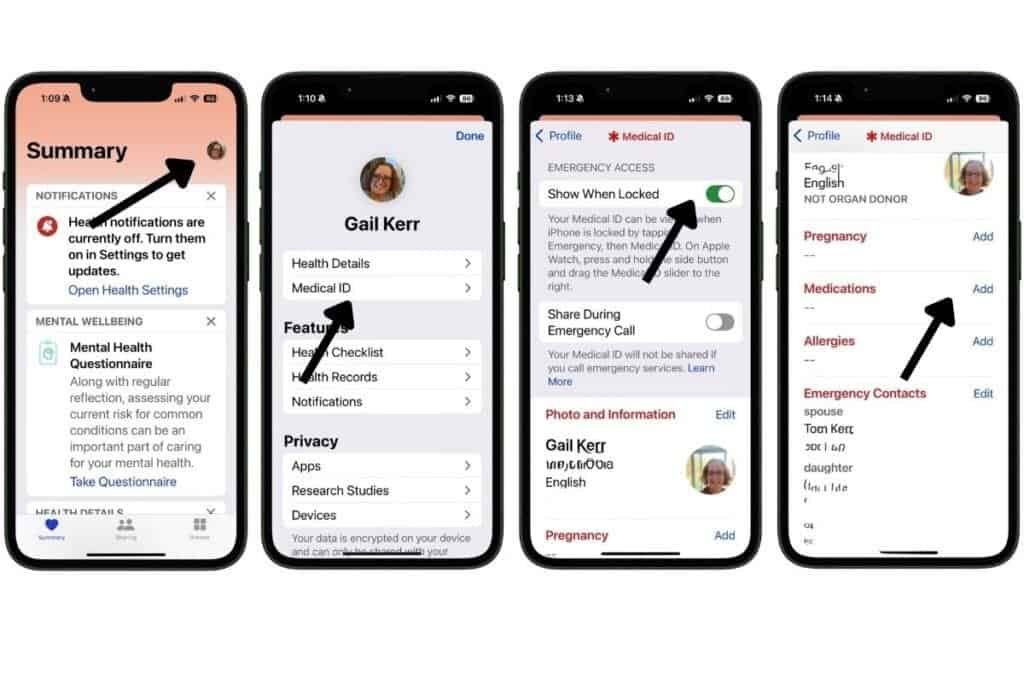
To set up your Medical ID:
- Open the Health app
- Tap your profile picture (top right).
- Select Medical ID.
- Turn on Show When Locked so it’s visible from your Lock Screen.
- Tap Add, to fill in any health info you think would be helpful (conditions, medications, allergies, etc.
- Tap < Profile in top left corner.
- Tap Done.
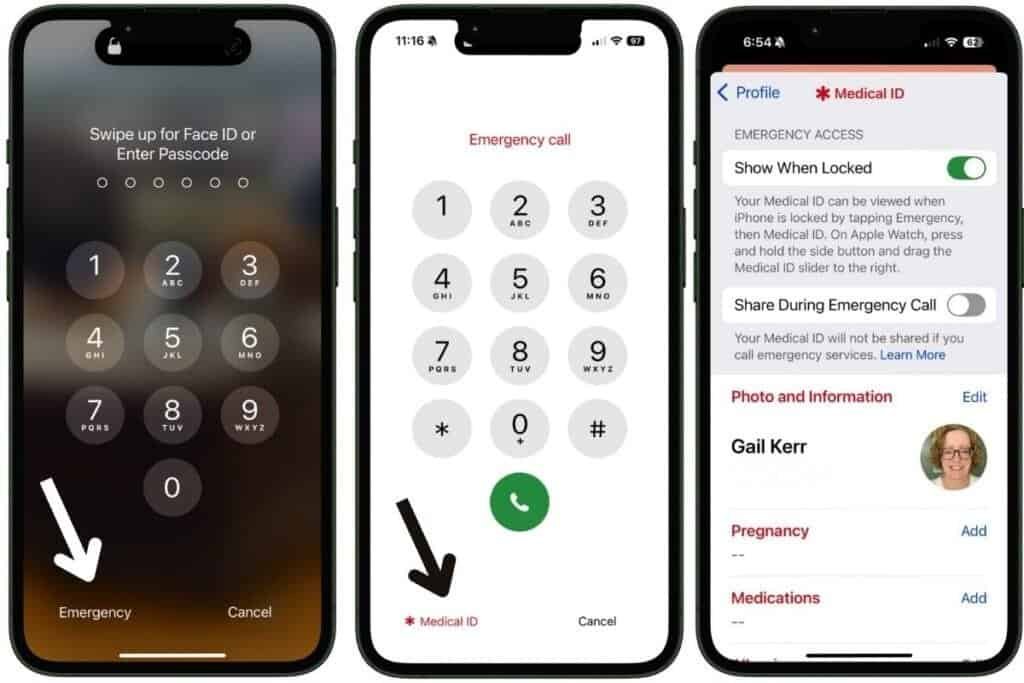
To view someone’s Medical ID, tap Emergency on the passcode screen, (Face or Touch ID can’t be used) then Medical ID. This works even if the iPhone is locked.
Once your Medical ID and contacts are all set up, it’s time to give it a test run—so you know exactly how it works in a real emergency.
Practice Using Emergency SOS (Without Calling 911)
Alright, now that everything’s set up, let’s make sure you feel confident using it. The last thing you want in a real emergency is to fumble around trying to figure it out. Practicing ahead of time, even just once, can help you stay calm and act fast when it really matters if you ever need to use it for real.
Try this safe test:
- Press and hold the side and volume buttons.
- The screen with the 3 sliders, Power off, SOS Emergency Call and Medical ID will display, but keep holding.
- Watch the countdown begin.
- Let go before it finishes to cancel the call.
You’ll still feel the haptic feedback and hear the sound (if enabled).
IMPORTANT: If you call 911 by accident, don’t hang up. Wait for the responder to answer and explain that you do not need help.
Or try this with a loved one:
- Walk them through the Emergency SOS buttons.
- Show them your Medical ID.
- Help them set it up on their own iPhone.
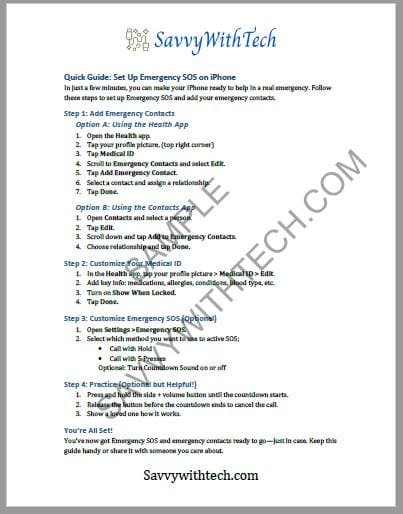
Quick Setup Guide: Free Printable
Before we wrap up, I’ve put together a simple Quick Setup Guide you can print and keep handy—or share with a loved one. It walks you through the key steps to get Emergency SOS and emergency contacts set up on your iPhone, so you can follow along without flipping between screens. Perfect if you’re helping someone else set theirs up, too.
Get your free Emergency SOS on iPhone Quick Setup Guide here.
Emergency SOS on iPhone: Final Thoughts
Setting up Emergency SOS might seem like one of those things you’ll get to “someday,” but trust me—it’s worth doing now. In just a few minutes, you can have your emergency contacts, Medical ID, and SOS settings ready to go. It’s a simple step that could make a huge difference in a serious situation.
Whether you live alone, have a health condition, or just want that extra layer of peace of mind, Emergency SOS is one of those iPhone features that’s good to have and even better to know how to use.
And don’t keep it to yourself! Share this guide or the printable quick setup guide with a friend, parent, or neighbor. You never know who might need it.
Emergencies are unpredictable. But being prepared, that’s something you can control.
Was this helpful? Share this post or drop a comment below.
Follow me on Facebook so you never miss a new post or sign up for my newsletter for weekly tips delivered right to your Inbox.

Gail Kerr
IT Professional and Technical WriterTechnology has been a part of my life for as long as I can remember. I have over 27 years of experience providing computer support in large corporations and small businesses. I went back to school in 2009 to get an Associate Certificate in Technical Writing so I could take my love of tech and become proficient at writing clear and easy to understand documents for people of all levels. I’ve become the go to person for family and friends whenever they have tech questions or challenges.

